Building technology
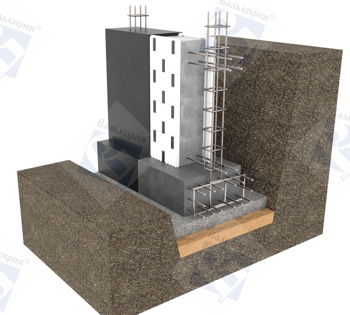
Foundation is the most important part of a building. It is the basis of your house. It must be done correctly and qualitatively in order to avoid many difficulties and problems that may arise in the future, both during construction and during the operation of the building.
The type of foundation is determined in accordance with the recommendations of geodetic surveys in the "spot" of development, as well as taking into account the specifics of the project and the development of the designer.
Depth of the foundation must reach the depth of freezing of the soil in the region, for the Kyiv region this figure is 100-120 cm.
Before pouring the concrete, it is necessary to cover the entire area under the foundation with a layer of river sand and crushed stone, according to the design decision. This is done to drain the rainwater from under the foundation.
There are also a number of operations that are necessary to properly lay the foundation, but we will not describe them in detail because they are similar to traditional construction techniques.
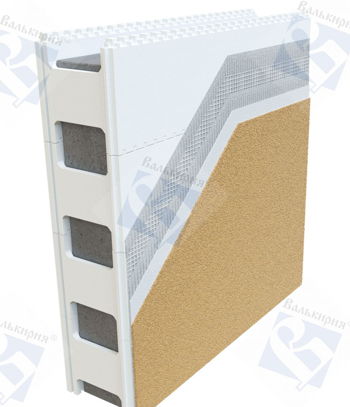
The only important difference is that the thermoblock wall (compared to a brick wall of 2 bricks) is not 50 cm thick, but 25 and weighs not 980 kg, but 360 kg, so the foundation may be much thinner.
For a thermohouse wall, it is quite enough that the foundation is 30 cm thick, not 60 cm, as it would be in a brick house.
This is quite enough to withstand the necessary load, plus considerable savings on materials and excavation work. Before erecting the walls, it is necessary to level the foundation with mortar and perform waterproofing over the entire area.
Walls
After all the foundation work is finished, you can start building the walls.
An important point is the fact that on the first day only one row of thermoblocks, i.e. 25 cm high, is installed along the perimeter of the foundation.
Then you should carefully measure the distances (wall lengths, diagonals, corners) of the exposed rows.
Use a level to make sure that all the blocks are aligned exactly, both vertically and horizontally. This is necessary so that during the further construction of the wall, it will not move sideways and there will be no deviations from the project.
During the installation of the first row, the architecture of an entire floor is formed, so it is important to take into account in the right places the slopes of door and window openings, the places of adjoining of internal walls, to install sewer and ventilation pipes inside the thermoblocks (if it is stipulated by the project), as well as to lay the reinforcement.
We do not recommend using welding equipment when installing reinforcement, as this is unacceptable in monolithic construction.
Reinforcement of the walls should be based on design calculations, taking into account the loads that will affect the wall, so to give a clear answer on what will be the step of reinforcement and the diameter of the reinforcement can only the designer who is involved in the development of the project, or a specialist Valkyriа Ltd.
We will introduce you only to the principle of the reinforcement of the walls. Along the perimeter of the entire building, in the first row of blocks, horizontally, lay the reinforcement cage. It consists of 4 reinforcing bars connected with each other (the distance between the bars is 10 cm). The same frame, only vertically, should be laid in every corner of the building, at the window and door openings and in the last row of blocks, before laying the floor (sometimes in the last two rows).
After completing all the above-mentioned operations, you can proceed to concreting.
The concrete should be poured to the level of the top edge of the thermoblock lintel. Before the concrete has cured completely, it is necessary to double-check whether the blocks are properly positioned horizontally and vertically and, if necessary, correct them.
After the first row of blocks has been poured concrete, the construction should be left until the next day to allow the concrete to gain sufficient strength for further construction.
On the second day you can put another 4-6 rows of thermoblocks (height of 1-1.5 m) and pour concrete. Often in individual construction (if two or three workers are involved) when making concrete directly at the construction site, workers do not have time to prepare the required amount of concrete and pour 2-3 rows of blocks (50-75 cm) per day, which is not a violation of construction technology. Just the speed of construction of walls in this case somewhat reduced.
Row after row of blocks is laid and concreted until the moment when you want to mount the floor slabs. The wall should stand for 7-10 days before it is covered with a floor panel. This is necessary to allow the concrete to gain the necessary strength.
Angle forming
The corner is formed by putting together thermoblocks. No special block shape is required to form a corner, it is quite possible to do with standard row and end thermoblocks.
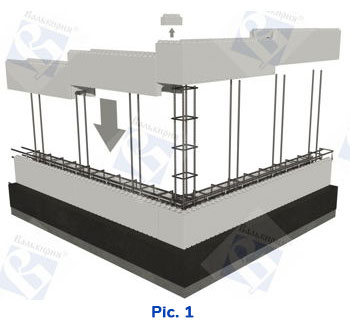
In order to distribute the concrete over the entire perimeter of the walls, the interfering parts of the thermoblock walls are cut out (figure 1). In this way, the concrete fills the entire interior space and forms a monolith.
The corner must be reinforced (Figure 1). To do this, a reinforcing frame of 4 rods tied together with tying wire is placed in the corner cell (the distance between the rods is 10 cm.
In addition, in the two cells adjacent to the corner also need to lay a vertical bar of rebar, as shown in the figure.
As already mentioned, the diameter of the reinforcement and the step of reinforcement should be calculated by the designer when creating the project.
If it is necessary to make an angle of a certain degree, the thermoblock is cut with an ordinary hacksaw at the required angle.
Window and door openings
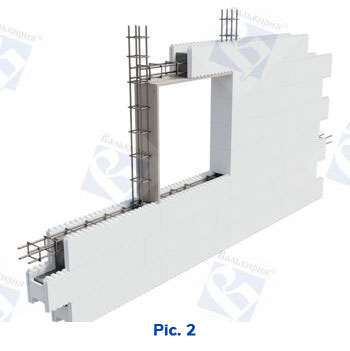
Knowing initially where the window and door openings of the house will be located, it is necessary to carry out additional reinforcement. For this purpose, in the outermost cells of the thermoblocks, you should lay one reinforcing frame each. It is also necessary to reinforce the upper part of the opening.
All the reinforcing bars and reinforcing cages shall be tied together with tying wire. (Figure 2). In some cases, it is more appropriate to use collapsible blocks over window openings.
Given the small cross section of plastic lintels, the beam we get will be more concrete-intensive and therefore more durable.
Reinforcement is required to distribute loads evenly on the wall of the house. The loads are different in each case, so the diameter of the reinforcement must be assigned by the designer or a specialist of Valkyria LLC.
Floor slabs
For the device of interfloor floors can be used wooden slabs, monolithic or reinforced concrete slabs, but in the process of construction and preparation of the wall for a particular type of slab, there are some peculiarities.
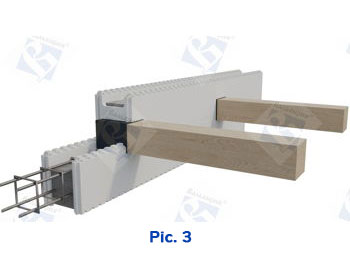
Wooden beams are laid as follows:
Before pouring concrete into the last row of blocks before the slab, it is necessary to lay a reinforcing frame around the perimeter of the house;
Concrete shall be poured to the top level of the lintels of the last row of blocks;
After the concrete, the wall should stand for 7-10 days, during this time the concrete gains the necessary strength;
Then you must cut out the top of the wall blocks, on the inside of the wall, a small gap (size depends on the cross section of the beam), in order to subsequently the wooden beams were laid on top of the concrete. If you use row blocks, the holes should be cut in the cells of the block (not over the lintels), so that the beams were laid directly on the concrete;
After the wooden beams have been mounted in their places, the next row of thermoblocks must be laid. To do this, the required size openings are cut in the bottom of the thermoblock wall, on the inside of the wall;
Before pouring the concrete, it is necessary to waterproof the part of the beam that will be in the concrete;
Pour the concrete again in the last row of blocks. Very often, it is more expedient to use collapsible blocks in the last row.
The monolithic belt, which we get, will in this case be more durable. This is extremely necessary if the number of floors of the building is more than 2 floors.
Then the construction continues according to the usual technology.
In the case of reinforced concrete slabs, additional reinforcement is required because of the high loads on the walls.
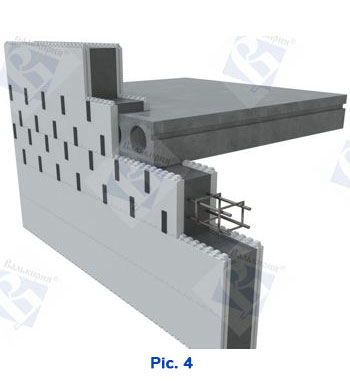
The scheme of work in this case is as follows:
All around the perimeter of the house, a reinforcement cage is laid in the last row of blocks (as shown in Figure 4)
Part of the inner partition is cut off to the lintel and a removable formwork is put so that the monolithic belt under the slab is wider by the thickness of the block wall
After the concrete has been poured, the wall should stand for 7-10 days before the floor slab is mounted on it
After the floor slab has been mounted, you will need to cut off one wall from the block and place it on the outside of the wall. The standard floor panel is 22 cm high and the block wall is 25 cm, the remaining 3 cm are usually used for the screed.
When using reinforced concrete slabs, it is advisable to use collapsible blocks in the last row. Less often in the last two rows. The monolithic belt that we get in this case will be more durable. This is essential if the number of floors of the building is more than 2 floors. Subsequent construction is carried out according to the usual technology.
Non-standard architectural solutions: "round" or "radius" walls.
To get the rounded shape of the walls blocks of standard shapes and sizes are used. On the inside of the blocks it is necessary to make vertical notches, 1-5 cm wide (depending on the required radius) in front of each cell. Then the block is bent, and in order to fix the necessary shape, the inner wall of the block is fastened with a usual scotch tape or adhesive tape. After the wall has been built of such blocks and poured concrete, the tape can be removed (when the concrete has already hardened).
Sewer and ventilation pipes
As for ventilation and sewerage, this issue has been taken into account and solved in the creation of a thermoblock, the pipes are easily laid inside and brought outdoors, where necessary. When laying the ventilation and sewerage pipes, we recommend the use of PVC pipes as they are more reliable and cheaper than their cast-iron counterparts. The pipes should be installed inside the thermoblock wall before the concrete is poured. As a result, we get concreted pipes protected on both sides with 5 cm of styrofoam. Using this technology provides maximum protection against possible damage to the pipes.