Mistakes during the construction of the thermohouse
Dear friends!
Thermodome technology in recent years has firmly taken its specific niche in the market of wall materials and structures. We, as manufacturers and founders of this technology, can not but rejoice.
It is no secret that today in Ukraine there are dozens of manufacturers of thermoblocks. There is a certain competition, where the main argument in favor of their products is the price. There are several ways to reduce the cost of production, and almost all of them lead to the loss of quality of the final product - a thermoblock. But it is only half the trouble. With blocks of bad density or blocks with irregular geometry you can still build somehow. The main trouble is that not all manufacturers of thermoblocks inform their customers how to build? What kind of concrete to use, how to make the correct reinforcement in this or that case, etc.
Below, we have tried to identify the major mistakes a buyer may encounter when choosing thermoblocks for the construction and when choosing a contractor for the construction work.
We hope that this page will benefit you and help you avoid many problems during the construction of your Thermodome.
We deliberately will not name the names of developers, as well as manufacturers of thermoblocks.
The gap between the blocks arose for several reasons (photo 1,2). Blocks have ineffective longitudinal lock type "tongue and groove," which practically does not hold the blocks together, and during the pouring of concrete they floated up. To prevent this from happening, they had to be tied together with wire (inside by the lintels), or tacked together with U-brackets at the time of concrete pouring. The resulting gap is a cold bridge. The way out: to blow out the gap with foam, but this will lead to an increase in costs, both physical and material.
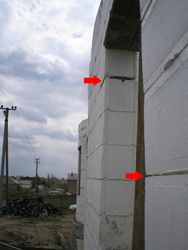
Photo 1
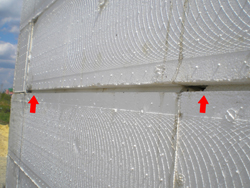
Photo 2
In photo 3 you can see what you get if you undercut the blocks when forming the corner, by eye, the resulting gap is a visual confirmation of this.
The "sloping" of the corner is quite troublesome to fix (photos 3,4). The impression is that the builders did not know what a vertical level is. There are two ways out: cut with a hacksaw or sandpaper off the excess foam board, or glue a sheet of foam board of different thicknesses on the outside to achieve an even plane.
The gaps in the photo #4 are another proof of the bad geometry of the blocks and the irregular shape of the lock.
Window openings (photo 5), I do not even know how to comment here ("no coment")
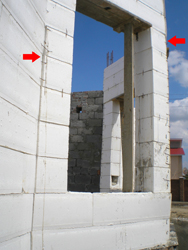
Photo 3
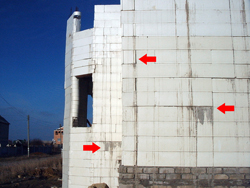
Photo 4
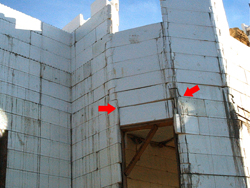
Photo 5
Apparently, the blocks have a very low density, so when the concrete was poured, they just broke off (photo 6). Now we will have to level the wall by cutting the foam.
Photos 7 and 8 show the ineffectiveness of the longitudinal tongue-and-groove joint. There is a lot of water leakage with the grout. The less cement in the concrete, the lower the concrete grade and therefore the wall does not have the load-bearing capacity it should have.
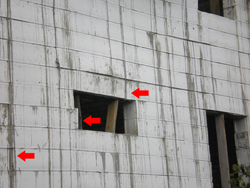
Photo 6
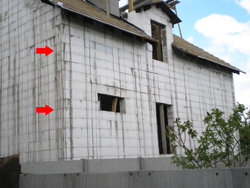
Photo 7
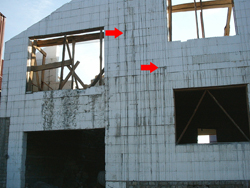
Photo 8
How the builders managed to arrange the blocks in different planes is still a mystery (photo 9). Now the wall will have to be leveled by gluing the foam sheets.
In the corners we used blocks with the element of "rounding", the effectiveness of using these blocks remained unproven (photo 10).
Poor execution of window openings (photo 9,10).
The corner of the building looks like a "chessboard", to align such a corner is quite a time-consuming process. Also the presence of gaps and pop-up blocks (photo 11).

Photo 9
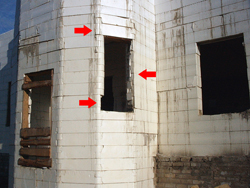
Photo 10
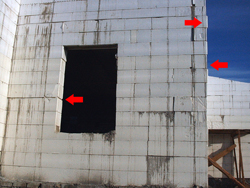
Photo 11
Photo #12 shows that the blocks in the corner are not tightly adjacent to each other, as a result - a gap and a cold bridge. There is no vertical level in the corner, at the bottom the blocks are "out".
It is not clear why the window aperture was made so poorly, or maybe there was no roulette, or the client really "pissed off" the builders (photo 13). The corner is rounded, the units are as unevenly arranged as in the window aperture.
In photo 14, the corner is again bent.
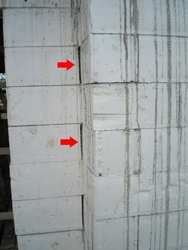
Photo 12
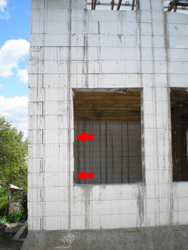
Photo 13
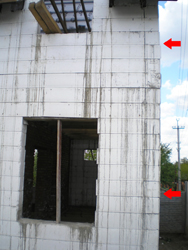
Photo 14
What was the builder's guideline for forming the corner? For the correct solution, an edge block had to be used. Concrete was poured into the gap, which will further affect the bearing capacity of the wall. Blowing with foam to eliminate cold bridges will lead to higher costs (photo 15-16).
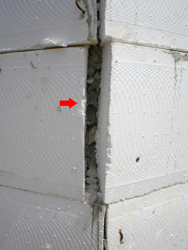
Photo 15
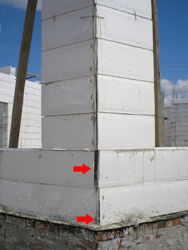
Photo 16
Photos 17 and 18 clearly show the very poor geometry of the blocks. The whole wall is in waves. Before plastering such a wall, you will have to level the foam with glue, which will increase the cost of the finishing work, as well as significantly overspending the glue. The solution to the problem can be leveling the relief of the wall with an emery board, but it is also an increase in the cost of finishing work.
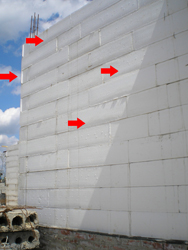
Photo 17
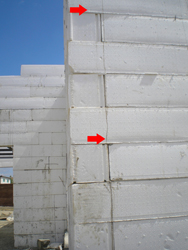
Photo 18