Recommendations for the installation of facade decor from Valkyriа
1. Storage Regulations
Styrofoam products should be stored horizontally, at room temperature, packed or covered from above. It is strictly prohibited to lean the products on the wall, as well as allow the products to sag on the sides or deflection in the center.
Products must not be exposed to sunlight or precipitation.

2. Mounting on the substrate
Installation of decorative products of expanded polystyrene can begin at an air temperature of 5 degrees Celsius and humidity not exceeding 70%. These recommendations should be adhered to during the entire cycle of work, until the products are completely dry.
Materials used during installation:
- Glue for gluing foam plastic.
- Glue foam for polystyrene foam.
- Polyurethane sealant.
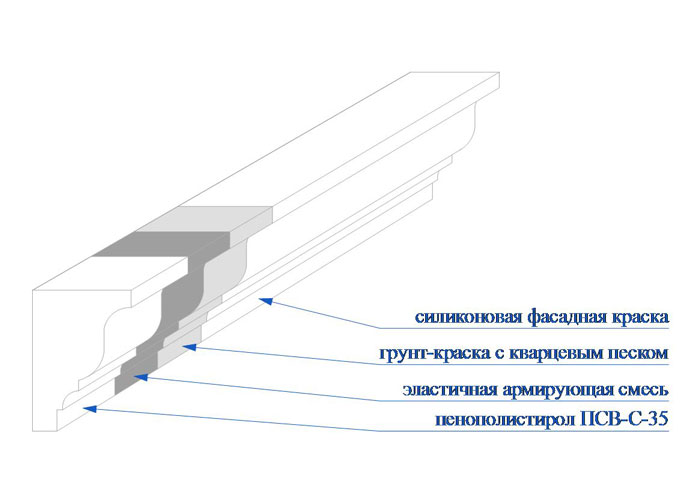
- Primer with quartz sand.
- Silicone facade paint.
- Preparatory measures:
The surface on which it is planned to glue the decor must be dry, cleaned of dust, grease streaks and other materials that reduce adhesion, as well as the surface must be strong and level, without any defects.
If the decor is glued to the substrate, which is highly absorbent to moisture, it is necessary to treat such substrate with a primer beforehand.
Installation with dowels or embedded parts:
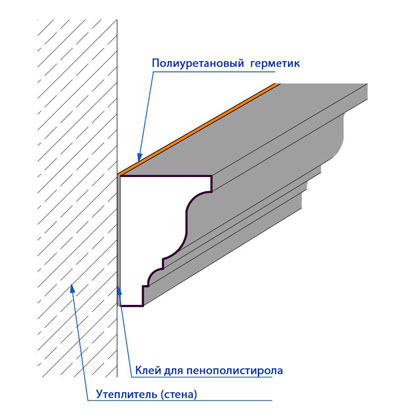
- To ensure tight adhesion of the decor elements to the surface of the substrate in any case adhesive is used, even if the decor is fastened using anchoring devices and other embedded parts.
- When installing the decorative elements, you should take into account the own weight of the products, as well as wind and snow loads.
How to apply glue:
- The adhesive is applied to the entire surface from the back of the product.
- For gluing large-format parts, both the part itself and the surface of the base are treated with glue.
- For very large pieces, dowels or anchors are used to hold the pieces in place with adhesive. We recommend using dowels when the details are at a distance of more than 100 mm from the wall.
- After the adhesive treatment, the part of the decoration is pressed tightly to the base and held in the designed position. It is necessary to press very tightly, so that the excess glue comes out of the surface of the mounted product along the entire contour.
3. Joining the elements
If necessary, all the elements of the decor after marking are trimmed with a hacksaw taking into account the thickness of the butt joint.

The process of joining products after trimming at an angle:
- The surfaces of the joints of the two parts to be joined are aligned, and machined, with sandpaper.
- Covering with jointing mortar should be such that when pressing the parts to be joined, the excess of jointing mortar is squeezed out along the entire line of the joint. The squeezed out excesses are cut off at the level of the surface of the part.
- The standard width of the joint is 2-5 mm.
- To grout the seams of the elements use adhesive for reinforcing decor or polyurethane sealant
The process of joining the even ends of the products:
The surfaces of the joints of the two parts to be connected are aligned, and processed, sandpaper.
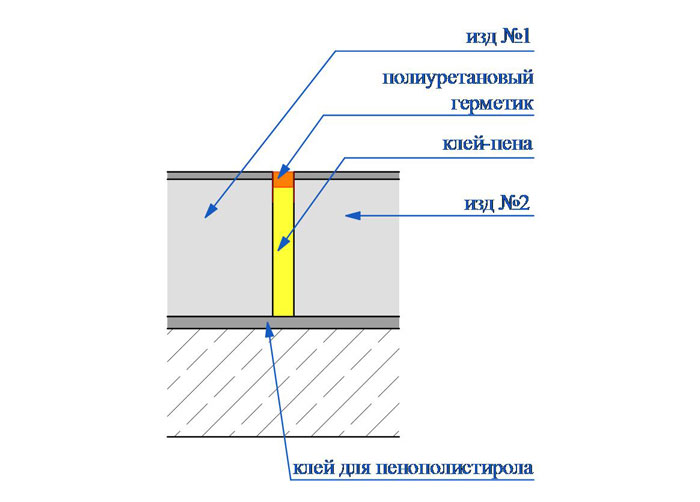
- Between the decorative elements during installation, leave a gap of 3-5 mm.
- The space is filled with glue-foam for polystyrene foam.
- After drying, cut off excess adhesive foam, and an indentation of 2 mm is made.
- Deepening of the joint is sealed with polyurethane sealant
- When using dowels, the recesses are filled with the same glue that was used to glue the decor.
4. Final Finishing
After the material at the joints has hardened, the joints of the parts are sanded with sandpaper. Then you can proceed with priming and painting, but not earlier than 5 days after the sealing procedure.
Silicone facade paints should be used for painting elements, because it must accept the same deformations as the coated decorative element. Otherwise, the paint may crack when the element is thermally deformed.
